Building the frame
Again I had a quick browse through my bookmarks, checking how others created a frame to keep it all together.
Most of them bought a ready-made frame, or a build-it-yourself one. Others created a box to hold everything.
 I myself preferred a wooden frame, something sturdy with a nice decorative border. Given the fact that I was not planning on spending a lot of money, an exclusive frame from the Renaissance was out of the picture (pun intended), so I choose to create a frame from MDF.
This material can easily be processed, it is sturdy enough to drill in and to hold screws, and it is easy to paint. Apart from that, the entire frame would only set me back 7 euros. In other words, an ideal frame for this project.
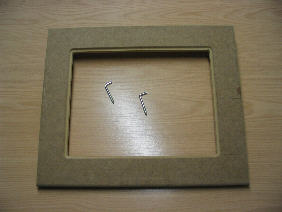
Making the frame was easy enough (on paper): create a little border around it, saw a big hole in the middle with the exact same size as the laptops visible part of the screen, and create another border around this hole. At the back, the wood need to be processed to form a lowered edge with the exact form of the screen to hold it.
The front part was no problem - the back side would need to fit as snug as possible in order not to let the screen slide, which was easier said than done.
Thanks to my father who used his saw and milling machine to give this frame its form, the screen fitted into the frame at the first attempt! Those tiny rubber blocks stuck to the side of the screen could even be used to position the screen!
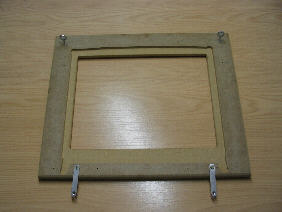 As you can see in this picture, below there are two holes to fit the hinges of the screen. At first I wanted to separate them from the screen, and (worst case scenario) even saw them off at the base, but after thinking about it for a while it turned out that it was better to keep these in the frame. Those two little iron bars are there to keep the hinges in place. Because the screen already fitted very snug into the frame, and those rubbers already held it in place, this would be more than enough to keep the screen in place inside the frame.
So far so good - but there still was a bit problem that needed to be solved: the fact that the screen was broken. Earlier on, I had already taken it apart completely, so I already had the chance to search for loose contacts. Several attempts later I still hadn't found a point of failure in the screen, and it occured to me that I would need to look for another solution.
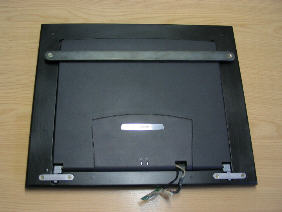 "Breaking" the screen as described earlier only solved the problem in "laptop-form", but once it was attached to the frame this would no longer be possible. The solution turned out to be simple as well as brilliant: two screws holding down a metal bar, pressing it onto the screen, would need to provide enough pressure. Seeing as though the pressure could not be to firm (so as not to damage the screen), I glued a self-adhesive block of foam against the metal bar.
After a few attempts I found the correct amount of pressure needed to make the screen work, without it being to high.
The only thing left now, was putting it all together!
Next page: Putting it all together »