Taking it apart
The list of defects made sure the Acer was the perfect candidate for a digital picture frame project.
First of all, I started studying similar projects. I've noticed that a lot of people prefer to completely disassemble the laptop, in order to keep only those components they really need, which are then mounted to the back of the screen. This part would later be placed in a frame as a whole.
I diligently started to dismantle the laptop. First, I carefully detached the case, then I started to take apart the laptop one component at a time. It's a known fact that laptops are compact, and not meant to be taken apart (too often). Here and there, plastic clips or placeholders would break off, despite the fact that I was trying to work as careful as I possibly could.
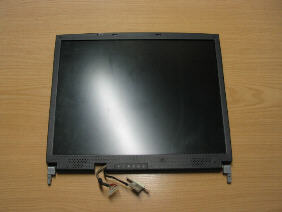 By now, the screen was detached from the laptop, and I noticed that it would be possible to place the screen behind the laptop in such a way that the cables of the screen could remain connected. In order to do that, I would need to cut away a part of the case. Since that particular place had the external VGA connector (which would not be used), it did not pose a problem. There was room enough to cut out a piece of the case, and it would not be visible in the end result. Other components would not be damaged.
 Using a box cutter, a small saw and some patience I started working on the case. Ignoring one little slip (when my patience ran a little thin), the end result was reasonable enough, and the cables could be connected while the screen was placed behind the laptop.
Unfortunately this did not prove to be an ideal situation - the cables would be placed under a certain tension, which would make it a possible point of failure. This meant that I was to extend the original cables, or find another few inches of cable somewhere. Now was an ideal time to have a look at the inside of the screen.
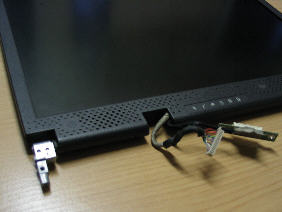 The screen was even more delicate to open than the laptop itself, but eventually I discovered the source of those cables at the bottom of the screen. As you can see on the picture, both cables now exit through the same hole, which wasn't the case originally. Because the shortest cable no longer needed to make that small detour, it became a bit longer. Not a great deal, but more than enough to leave room around the case so that both cables would no longer be placed under stress.
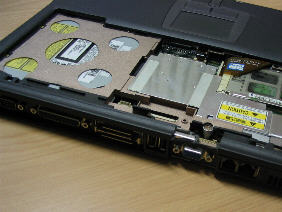
Experimenting a little further with the other components revealed that it was not necessary to leave the following components connected in order to boot the laptop:
- the floppy drive
- the little bar on top which holds the special function keys
- the keyboard
- the mousepad
None of these would be needed, so initially I decided to leave them out of the picture (pun intended) to save some wheight. In the end, they remained connected - I'll reveal later on why I went back on my earlier decision.
Next page: Building the frame »